

How To Change Logo Size In Wordpress
How to Change the Logo Size in WordPress with CSS or PHP
You'd think with WP being the world's most popular CMS, you wouldn't need to figure out how to change the logo size in WordPress.
After all, it's supposed to be the platform for building a website with no coding needed.
Well, that's not quite true!

You can build a website without knowing code, but you can't get them to look the way you want them to without a little coding know-how.
The ones you need are shared below.
How to Change the Logo Size in WordPress
You can change the logo size in WordPress using CSS or PHP. CSS stands for Cascading Style Sheet and it mainly works to reduce the size of your logo. If you want to increase your logo size, editing the functions PHP file is the brute force method to make your logo bigger.
Changing WordPress Logo Size with CSS Customization
CSS stands for Cascading Style Sheet.
When you only want to alter a design aspect of your site, there is a section in WordPress for that.
It's in the appearance customization menu.

Click "Appearance" then "Customize" and it'll load the customizer menu on the sidebar.
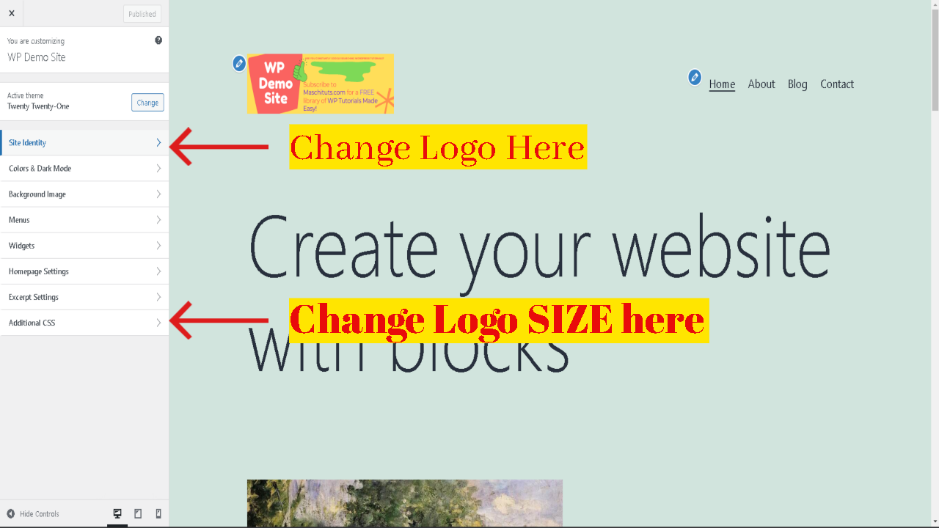
The "Site Identity" section is where you can change your logo. The "Additional CSS" section below it is where to change the size of your logo.
You can make them smaller using CSS, and depending on your theme, it might work to make your logo bigger. However, as you'll see below, it can also blur your logo.
Depending how much you're enlarging your logo by, you may be best to resize your image first, upload it to your media gallery, then replace your site logo with the bigger file.
CSS edits don't work on all themes. You can mostly downsize a logo, but rarely can you stretch it bigger.
The size dimensions are contained in the Functions.php so if you can't change your logo size with CSS code, you can probably do it with PHP. (Covered further down)
Start here though, because there's far less risk of breaking things.
Click on site "Appearance", then select "Customize", then from the customizer menu, select the "Additional CSS" option.
For this part, you need to know the "Class" of wrapper to tell browsers which part of the code to use.
The "Additional CSS" customizer overwrites the Cascading Style Sheet rules set in the Style.css file.
To find the CSS Class you need to change, open your website in a browser, right click on your logo, then select "inspect".
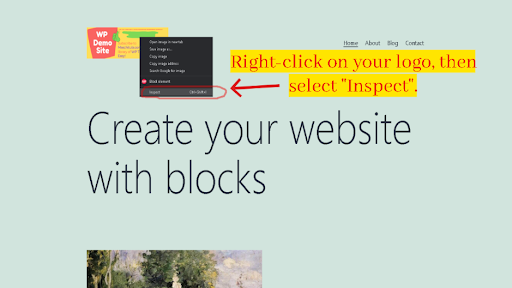
It'll change to a split-screen view showing a bunch of code on one side of your screen with your website on the other side.
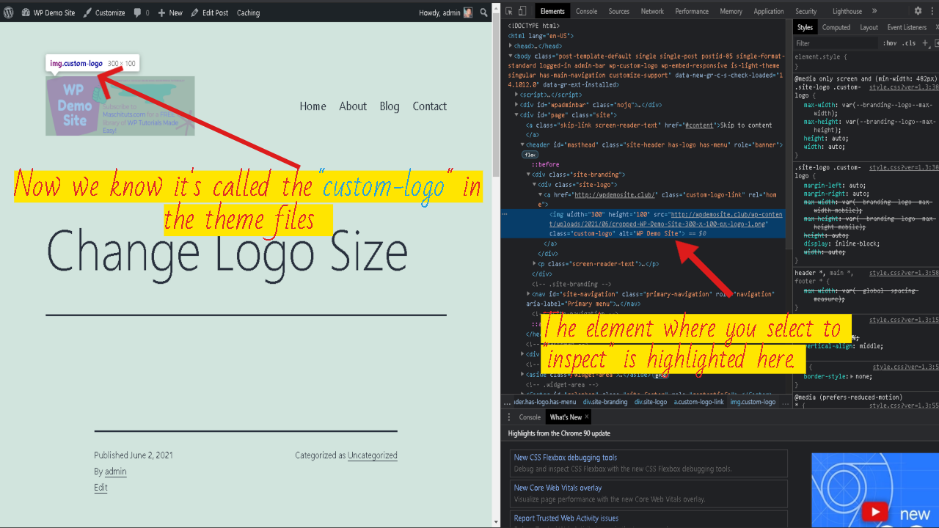
Hover your cursor over the element's sections (the messy code) highlights the part of the webpage you're inspecting.
In the above screenshot, you can see it's highlighting the logo.
Above the logo is the "Class" name. That's what we need for the code that's getting put into the "Additional CSS" section.
Take a note of what yours is called.
Copy and paste the code below into your CSS customizer.
.custom-logo {
max-width: 100% !important;
max-height: 50px !important;
}
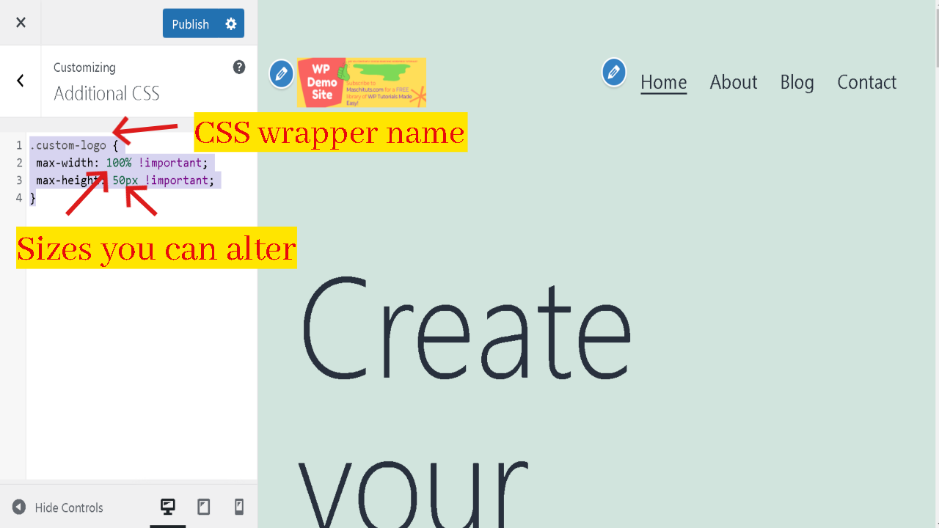
Where it says "custom-logo" in the code, replace that with the Class name you identified from inspecting your page in a browser.
Leave the rest of the code as-is and tweak the number values.
WordPress has a live preview editor so you'll see the changes in real-time.
Once you're happy with the sizes, click "Publish" and it'll make your resized logo live on your site.
That's if it takes.
On the Twenty Twenty One theme, the code only works to shorten the logo size. It doesn't make it bigger.
That's because on this theme, the size rules are pulled from the functions.php file and not the Style.css file.
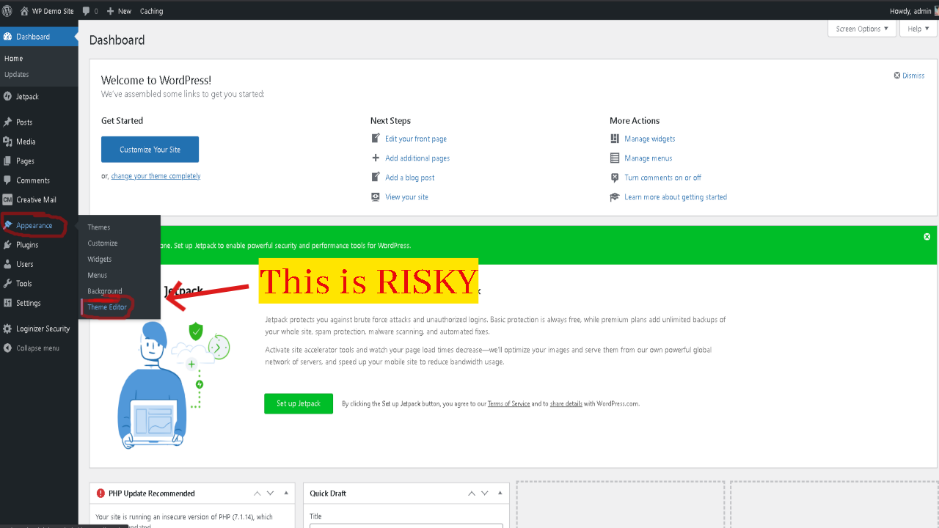
To resize a logo in WordPress themes that's coded in the functions file, that's riskier because you need to use the Theme Editor.
When you first load the Theme Editor, you'll get a Heads-Up warning screen from WordPress telling you this is a risky way to edit your site, prompting you to use the CSS editor instead.
Break the code in here, you'll break your entire site.
Before proceeding with this method, make a WordPress backup (including the database) in case you need to restore it. </span
How to Change the Logo Size in WordPress with PHP
To edit the theme, click on "Appearance" then select the "Theme Editor" option.
If your theme uses a Framework, such as Genesis, Divi, Astra, WP Zoom, Gantry or the likes, make sure you have activated a Child Theme.
If you haven't, you'll see a prompt at the top of the screen alerting you to the problem.
Here's an example of the Genesis Prompt telling us to "Please Activate a Genesis Child Theme".
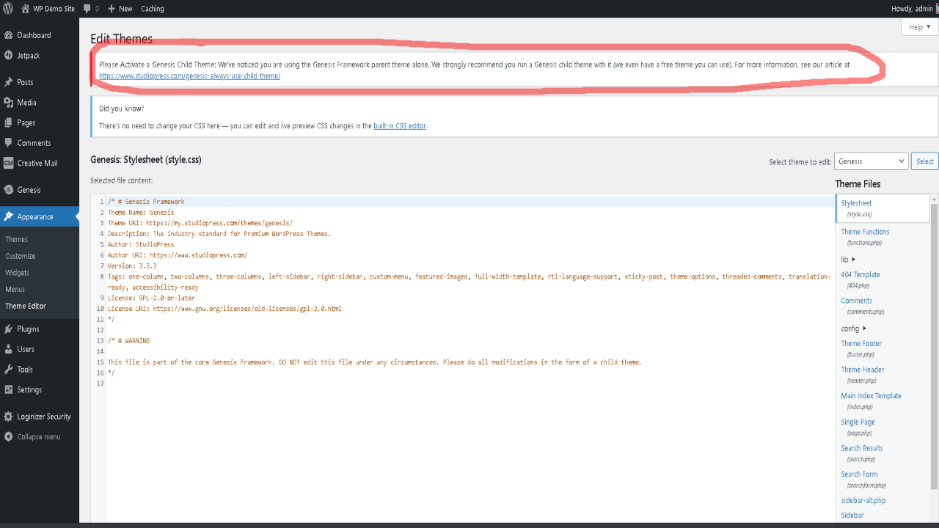
Frameworks are foundations that additional themes are developed on. This is one of those, just because you can, doesn't mean you should sort of things.
Definitely don't edit a framework. Activate a Child Theme on top of it and make your changes to that file.
In instances where your Child Theme is no longer supported, you can still install the updated framework, then install (and activate) your old Child Theme on top of it.
For this example, the Going Green Pro Child Theme has been installed, which is about 7-years outdated, yet it still works. That's the difference with Frameworks. Default WP themes are changing every year, usually breaking things when they're changed.
Static WP themes aren't always updated. Most of the major Frameworks are, even if the Child Themes aren't.
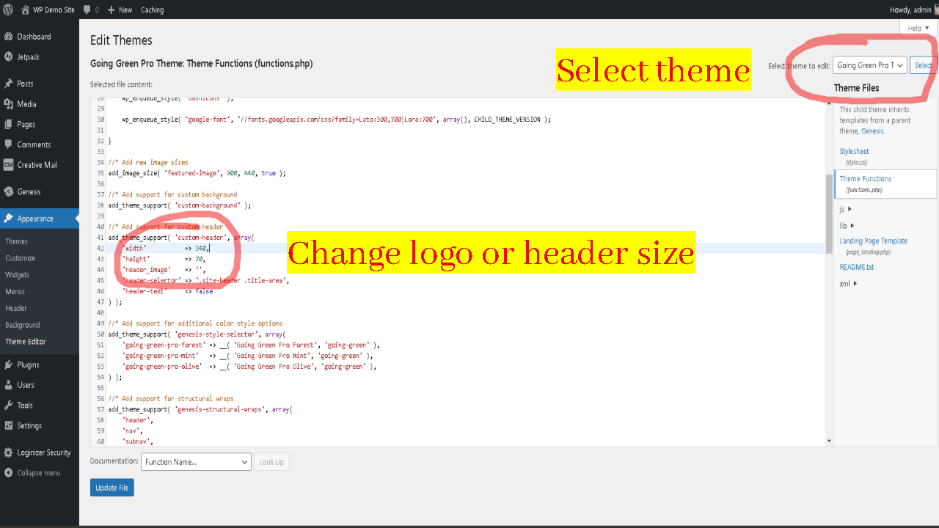
To edit themes directly, select the "Theme Editor" from the "Appearance" menu.
The top right shows you the theme template you're editing. Clicking it opens a drop-down menu showing all the templates you have installed.
Make sure you're editing the right one. Especially if you've installed a bunch of themes.
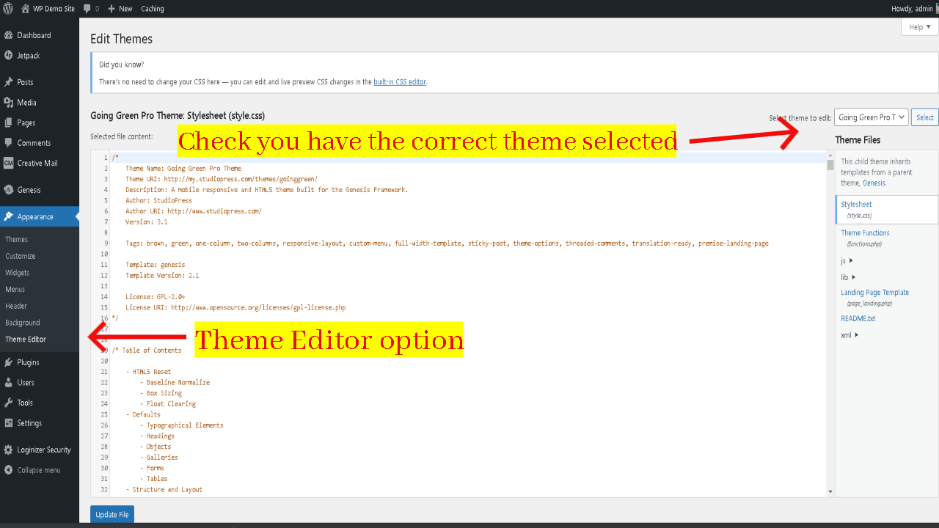
Once you have the right theme (or Child Theme) selected, the click on the "Theme Functions" file (functions.php) file on the right.
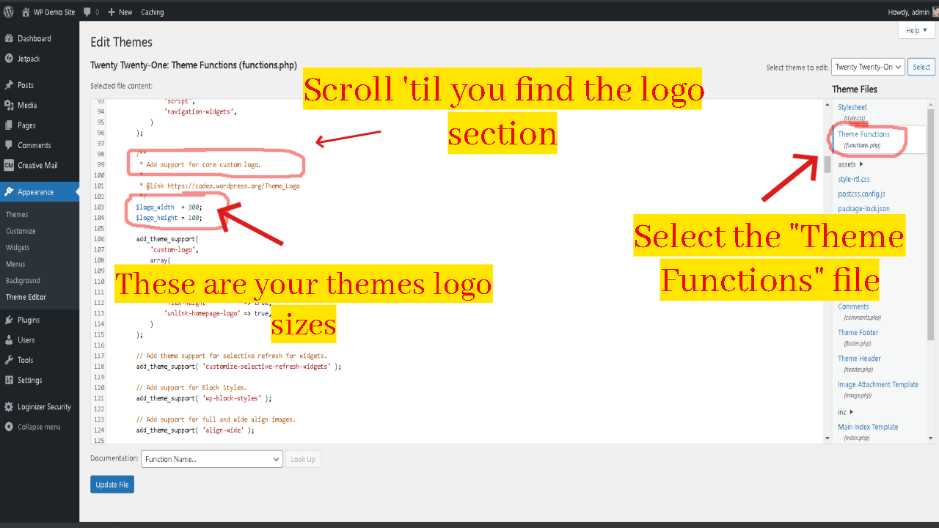
Once you've accessed the functions.php file, scroll down until you find the section for
"//* Add support for custom ___"
(The blank will either be "header" or "logo")
In the Twenty Twenty One theme, it's a "custom logo". In the Genesis Child Theme, it's a "custom header".
Under that will be the sizes you can change.
On this Genesis Child theme, it's
'width' => 340,
'height' => 70,
On the Twenty Twenty One Theme, the width is set at 300px with a max height of 100px. We can change those values here.
In this case, let's make it obviously bigger so we can see clearly what's changing. 1280 px by 720 px is the sizes this logo's being blown up to.
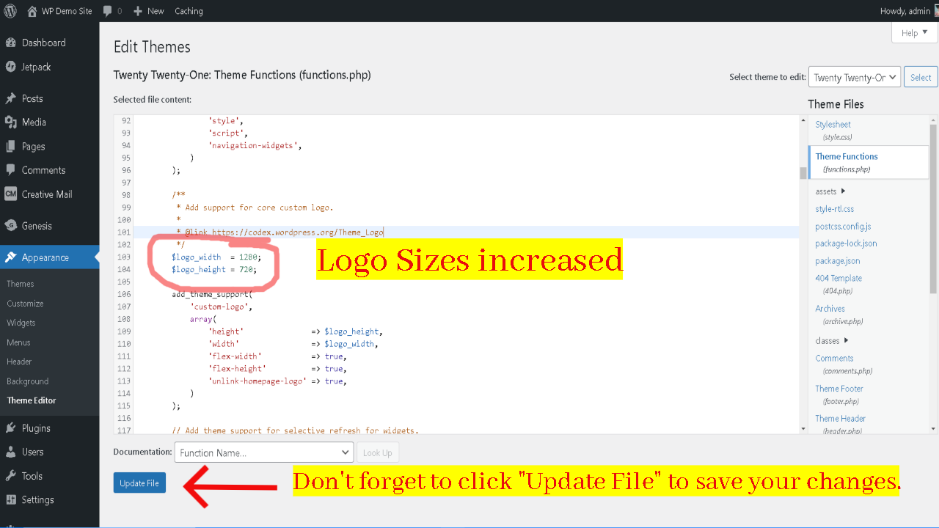
Once you've changed your logo size dimensions, you need to click "update file" for the changes to be saved.
The dimensions you put in here should be the dimensions of your logo.
In other words, don't use a logo size that's 300 px by 100 px, and have it blown up to be four times that size. It will be blurry.
It's better to have a logo in the size you need rather than stretching it by either manipulating PHP or CSS to stretch and enlarge it.
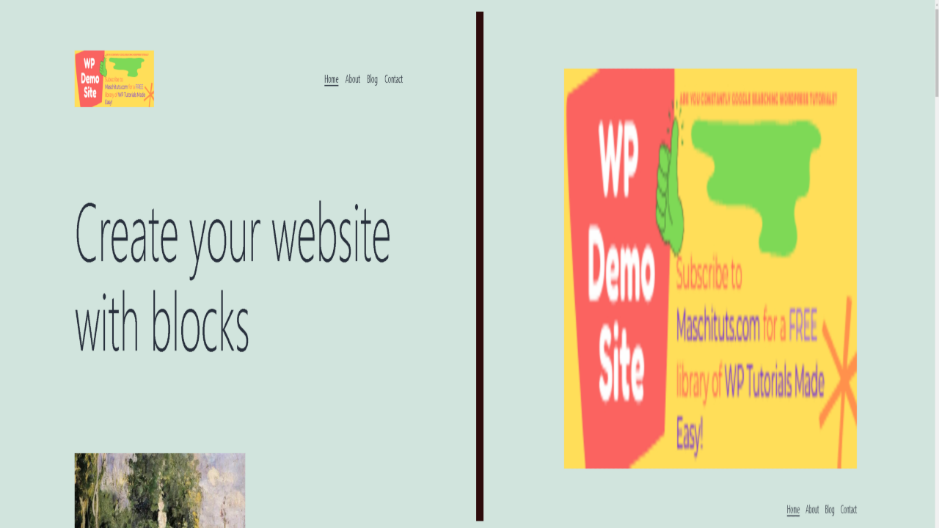
What you'd be left with is this.

That's the demo logo at its original size of 300px by 100px to fit the Twenty Twenty One default WP theme, then blown up to 1280px by 720px.
At that (smaller) size, it sat nicely aligned to the left of the page with the navigation bar on the right, beside it.
Now, it's blurry, the logo is blown up to the size of a header or banner that's so big that it's forced the navigation bar to fall below it.
Side by side, the differences are much more noticeable.
Shown below, the first images is the 300 x 100 px logo, the second is the same image blown up by changing the PHP file because CSS wouldn't take.
Suffice to say, you can make a logo the size of a header on WordPress themes that don't have a header-image.php file.
Just manipulate the Theme Functions file to make it do what you want.
Chances are, if you're going up in size, you'll need a bigger image.
Are there plugins in WordPress that can change the logo size?
Not directly. For your main site logo, the closest plugins are CSS editors.
The SiteOrigin CSS plugin works similar to the web browser right-click, inspect option, letting you identify elements from within your website.
Another plugin is the "Website Logo" by Kapil Yadav. Instead of changing the dimensions directly in the functions PHP file, logo sizes can be set using this code "<?php echo getWebsiteLogo($height,$width); ?>" where you'd replace the height and width with the values you want, such as $1200, $200.
The only real difference is the Website Logo plugin has shortcode functionality – [WEBSITE_LOGO].
That shortcode calls up the php echo function to display the logo anywhere the shortcode is used on the site. You still need to edit the theme files though. You don't need a plugin for that. Handy if you want it to show in the footer too though.
Can I change the Logo Size and Make it Sticky?
Smart thinking and yes, you absolutely can. Use the "Additional CSS" customizer to add the code below
.custom-logo {
position: fixed;
}
… replacing "custom-logo" with the element name that your theme uses to call up logo sizes. If doing this, adding "top: 0" before the closing bracket fixes the padding so that it sticks the logo to very top of the screen keeping the logo in view as visitors scroll your page.

Hey guys! It's me, Marcel, aka Maschi. I earn a full-time income online and on MaschiTuts I gladly share with you guys how I stay on top of the game! I run several highly profitable blogs & websites and love to speak about these project whenever I get a chance to do so. I do this full-time and wholeheartedly. In fact, the moment I stopped working an 8-to-5 job and finally got into online business as a digital entrepreneur, is problably one of the best decisions I ever took in my life. And I would like to make sure that YOU can get on this path as well! Don't let anyone tell you that this can't be done. Sky's the limit, really…as long as you BELIEVE in it! And it all starts right here..at Maschituts!

How To Change Logo Size In Wordpress
Source: https://maschituts.com/change-logo-size-wordpress/
Posted by: loftonbetwou.blogspot.com
0 Response to "How To Change Logo Size In Wordpress"
Post a Comment